Last updated: July 8 2023
The Museum of Television & Radio (MT&R) in Los Angeles has a small radio production studio that was really intended for talk show production. It has a small mixing board that accommodates five microphones, two DAT tape machines, two CD players, two analog cassette machines and little else. However, you don't need very much equipment to produce a radio drama. I'll describe the minimum necessary and if you have more than that available, good for you.
Microphones:
Dialogue Microphones:
In pictures of the golden era of radio drama, you'll see several actors, scripts in hand, clustered in a semi-circle around a big pillbox microphone (an RCA 44BX ribbon mic). Those b-directional ribbon mics were a big component in getting the intimate radio sound, and are available nowadays is expensive reproductions (see AEA's great line of ribbon mics) But it's easier to have actors arrayed in front of several microphones. You can get by with three to four Shure SM58 uni-directional dynamic microphones for dialogue. (You can find knock-offs of the SM58 for $20-$30 each. Try www.speakerrepair.com )
The SM58's are the sturdy, standard, inexpensive P.A.-style mics seen everywhere, (they resemble a cigar with a silver golf ball on top). We use three mics to accommodate the various heights of our large casts (7 to 12 actors), which often mix children and adults. The uni-directional feature of the SM58s limits the area where the mic is sensitive to one direction. (My apologies to the more technically savvy readers, but some people don't understand these concepts, so I will cover them as necessary. See Peter Elsea's Primer on Microphones, from the University of California at Santa Cruz's Electronic Music Studios.) A uni-directional microphone has unique pickup pattern (polar pattern). If you can imagine a balloon stemming out from the top of the microphone, that is the area where the mic is most sensitive. It is very in-sensitive in the area directly behind the mic--where the cord is plugged in. Pointing the mic away from some areas allows us to keep our mics from picking up unwanted sounds, such as the sound effects--which have their own mic.
I use mic stands with booms instead of straight-up stands. This way the actors can't accidentally step on the base of the stand and make a bump sound during production. I generally have my actors speak 6-10 inches from the mic. Any further and then we have to turn up the mic too much which brings too much "room tone"--along with air conditioning, etc. A small hoop wrapped with nylon mesh, called a pop filter, can allow actors to get closer to the mic without "popping" their P's. At the MT&R, we use 8-inch diameter pop filters due to our large casts and they really get the actors at the proper distance from the microphone. Pop Filters cost about $24-$30 and are available from musical instrument stores and the Markertek A/V supply house http://www.markertek.com.
We pair up our performers by height and assign groups to one mic. I try to have them speak into the mic from about a foot away, if you are much further back. you will hear the "room tone," which may not be desirable. If the script calls for a scream or shouted line, I tell the actors to shout up towards the ceiling. It's preferable to have two performers in the same scene be at the same mic since that makes their conversation more convincing, but sometimes you have to separate them. When two actors are at one mic, we control their volume with distance--we move quiet actors in closer and have louder ones stand further away--though not far enough to make the audience feel somebody is speaking from far away--we use that technique as an effect when called for by the script. Since it's generally confusing in radio drama to have more than four voices talking at once, three mics do the job nicely.
Special Uses of Dialogue Microphones:
We usually reserve one of our three dialogue mics for use with an effects device--either a tone-control-style filter to sound like a telephone voice, or a reverb to sound like somebody is in a deep cavern or that we're listening to somebody's thoughts--an interior monologue. Some of our scripts have actors speaking with a normal tone, say Lois Lane in her office, while she's on the phone with Clark Kent, whose voice is filtered to sound like it's coming out of a tiny telephone handset speaker. When we use this telephone technique, we also arrange the microphones so Lois' mic points 180 degrees away from where Clark's filtered mic is. In the following diagram, ----o is a microphone, with the dotted line representing the body of the mic and the circle representing the front of the mic--the silver golf-ball part.
Lois o---- (normal mic faces Lois) (filtered mic faces Clark) ----o Clark
This makes use of the SM58's uni-directional feature to prevent Clark's normal-sounding voice, as heard in the studio, from "leaking" into Lois's mic and undercutting the sound of his filtered, telephone-style sound.
Microphone Effects Devices:
Some radio scripts require characters to be talking on the phone, in a cavern or from behind a door. This requires changing the sound of the actors voices to convince the audience of these facts. The classic radio thriller, The Shadow, used a telephone-style voice to signify when the main character was invisible (on radio!). These kind of effects require some technical trickery. For the muffled, distant voice behind a closed door, have the actor step back from the mic and speak into a cigar box missing one side.
For telephone-style voices, you need to take the normal sound of the actor's voice, cut all the bass frequencies and boost the higher frequencies. A cheap way to approximate the sound is to have the actor talk into a coffee mug or deep plastic tumbler held besides their mouth and close to the microphone. The professional way to do this is via an electronic tone control.
Some mixing boards will allow you to cut the bass and boost the highs and "thin" out the sound; However, the MT&R's board had no tone controls and other sound board tone controls may not cut or boost enough (A 15 dB boost/cut is typically used to approximate telephone voice effects). But even with a mixing board EQ, the sound isn't convincing. (I built a special telephone filter mic out of 1960s phone elements and I offer those for sale at The RuyaSonic.com Depot.) In the old radio scripts this telephone voice sound was called a "filtered voice" or indicated as (FILTER). Here's a script sample:
CLARK KENT: (FILTER) Lois? I'm calling from a phone booth...
For cavern sounds we originally tried having the actors stand quite far away from the mic, but the actual size of our studio wasn't big enough to sound like a very large cave. Some modern mixing boards have digital reverb effects built in. Our board doesn't, so we use an external reverb device. You can find these under-$100 devices (about the size of paperback book) used to provide various room-size simulations for guitars and drums. We plug a mic into this black box on one end, and plug a mic cable out of the box and into our mixing board.
The best route is to use a semi-pro mixing board like the ones from Behringer or Mackie. They can route mics, effects devices and CD inputs any way you want. You'll need enough inputs for 6 mics or so, plus two CD/MP3/SD playback devices, and maybe a "line-in" input for a keyboard player.
Sound Effects Microphones:
For sound effects on a couple of cafeteria tables, we placed 2-3 Shure SM57 microphones around them. These mics have a tighter pickup pattern. (Again, You can find knock-offs of the SM57 for $20-$30 each. Try www.speakerrepair.com )
Just as we use the reverb devices to make the actors sound like they are in a cavern or having an interior monologue, or speaking from Heaven, we also put the sound effects microphone through a reverb to give them a different quality. All the advice above regarding black boxes and adapters applies here too. However, we use a second reverb device just for the sound effects, so we can control the amount of reverb separately from the dialogue reverb. The amount of reverb can be adjusted with a knob on the black box from none at all (called "dry") to way too much reverb ("wet"). We've found that if the dialogue is too wet, audiences have a hard time understanding what's being said, but sound effects need to be a bit wetter than the dialogue for the cavern-effect to be convincing. However, please note that if the sound effects get too wet, they become mere "noise" and lose their effectiveness. If your audio is not clear--the audience loses their focus and your drama will suffer--they could even tune to another station.
When using a microphone with an effect, we often have actors step from one mic to another depending upon if they use the effect or not--like if a character is using reverb to introduce a flashback, but then appears without reverb during the flashback. I always mark their script with [REVERB] or [DRY] to keep them straight.
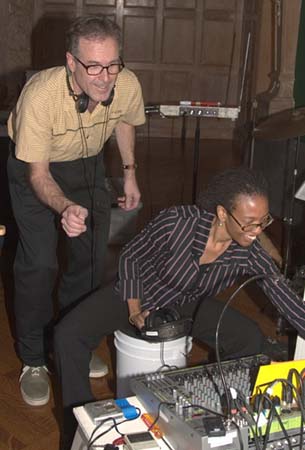
Mixing Consoles
The MT&R production studio came with a "broadcast" mixing console--although it isn't particularly suited for radio drama. You should look into a mixer that has several inputs (for each mic as well as your music playback devices) along with tone controls and the ability to send/return effects devices. Putting the effects devices through such a dedicated "effects loop" is a much better way to control noise and effects levels (wet/dry) than putting the device "in-line" from the mic to the sound board input. Most music production mixers, such as those from Mackie, Tascam and Panasonic will have these valuable features. Headphone mixes for at least the director and sound effects people are desirable. Behringer offers quiet, inexpensive mixers well suited to producing radio drama--live or in the studio, several come with built-in reverbs and other effects.
Headphones
I highly recommend Sennheiser HD-202 headphones—available between $20-$30 on-line (Search at Google for: Sennheiser "hd-202”) These headphones are comfortable and provide great acoustical isolation from the sounds nearby—something very useful when the SFX artists or keyboardist must gauge their own volume and balance in the mix. I’d suggest headphones for the sound effects artists and the director. Also buy a straight (not coiled) extension cables. Get 20-foot or 25-foot cables. The Sennheiser HD-202 headphones use a 1/8” plug, but come with a 1/4” adapter, so you can get extension cables with either 1/8” or 1/4” male and female ends. Try Radio Shack or search Google for: 25 Foot Stereo "Headphone Extension Cable" 1/8
Music Cues
We use between 13 and 20 music "cues" per program--everything from the program themes and episode intros to "stings," music beds and even some car driving sound effects. For more information about finding and using music cues, see my page Fitting Music to Radio Drama.
We currently play our music cues from custom made CDs. (CD-Rs--as in, recordable). When a music cue is called for, we push the track number and pause button--wait a second for it to cue up, then release the pause button to trigger the cue. A decent home CD-player can do the job. Fancier broadcast CD-players can even skip the between track gaps and self-cue themselves. However, if you burn your own CDs with music cues, make sure to test them in the intended CD-player well before production--some CD-players won't sync up fast and some CD-players won't play some CD-R discs at all--it depends on the blank CD-R media and the CD-player. Also, CD-players can vary in how long a new track is muted before it starts to play--if your track starts at 0:00, it's possible that the first second or two of music could be muted--yuck! In my professional rig, I use an American Audio SDJ-1 Dual SD MP3 Player (try www.amazon.com)--it uses plays MP3s from those SD memory cards that all the digital cameras use nowadays.
When I burn music cue CD-Rs, I always put eight seconds of silence at the end of the track. The ending silence gives the engineer a safety period to turn down the music channel on the mixer before the next track starts--sometimes engineers get busy and run out of hands. You may want to put less silence between those tracks that must quickly play back-to-back. For manipulating the time between tracks, I highly recommended CD-Architect, the CD burning software available from Sonic Foundry http://www.sonicfoundry.com. It was perfect for cutting radio drama cue CDs. Look for other fancy CD-R burners--especially ones that let you manipulate the index points. Another option is to use two CD players and two identical CDs, then alternate between machines for every other cue.
Another approach would be to use a "sampling" keyboard that would trigger the cues from specific notes, or have a computer play music cues as sound files in the popular MP3 format.
I would only suggest that whatever method you use, you may need to have two devices to play music--not for back up, but for back-to-back playing. If a script has a battle raging, you'll use one machine to play the battle music, but once the battle scene ends (which can vary based upon how fast the actors speak), you may need to play another cue immediately and you can't wait while you swap tapes or CDs or wait for the next CD track to be reached. If you need super-fast triggering, use two machines.
If you use duplicate CDs to cue from, just keep your track numbers straight. Here's how I indicate machines and tracks for a music cue when writing a script: A is for machine 'A' and the 5 if for CD track #5:
4. MUSIC:[A-5] STORMY DREAMS-ESTABLISH. LET IT FINISH.
Here's what I provided for the engineer on a horror show called "Grim Scary Tales." The numbers in parentheses indicate how long the cue runs on the tape in minutes:seconds. The designation BED means there will be dialogue under the cue and BRIDGE means the music plays between scenes with no dialogue under. The [Machine: A -#1] indicates which CD-player and the track number for this music cue.
MUSIC CUES: “Crusade of Terror!”
1) Grim Scary Tales Intro (BED) (0:40) [Machine A - #1]
2) Episode Intro/Battle (BED) (1:00) [B - #2]
3) Elsa’s theme (BED) (0:25) [A - #3]
4) Citadel Celebration (BRIDGE) (0:15) [B - #4]
5) Stormy Dreams (BED) (0:15) [A - #5]
6) Cavern Tomb (BED) (2:10) [B - #6]
7) Eblis theme (BED) (0:25) [A - #7]
8) Elsa Underground (BED) (1:20) [B - #8]
9) Ghoul Attack (BED) (0:40) [A - #9]
10) Tender Garrick (BED) (0:34) [B - #10]
11) Ascent of Eblis ((BED) 0:45) [A - #11]
12) Rid-Go Commercial (0:33) [B - #12]
13) Grim Scary Tales Outro (BED) (0:30) [A - #13]
Marking up the Script
The director, together with the engineer, should go over the script and mark it up as to where, when and how long music cues run. The designation BED means there will be dialogue under the cue and BRIDGE means the music plays between scenes with no dialogue under. I use two different hi-lighter pens (one for Machine "A" and the other for Machine "B" cues) and highlight the cues. Then I draw a vertical line with the hi-lighter through any dialogue or sound effects cues to show just how long the music cue runs. Some DAT/CD machines (or cues) may need a bit of time to begin playing--if so, we will mark the script to begin the cue just a bit earlier than where the script indicates.
Here's a representation--as can best be presented in HTML of what we do. I can't show the vertical lines, but explain where they would go, below.
(page 8 from my adaptation of Macbeth: Act 4, Scene 1)
Shakespeare On The Air
“Macbeth”
8.
1.
MACBETH: That will never be. Who can impress the
forest?
Yet my heart throbs to know one thing. Tell me,
if your art can tell so much, - shall Banquo’s issue
ever reign in this kingdom?
2.
SOUND: THUNDER.
3. MUSIC:
[A-2] WEIRD MUSIC-UP. DUCK FOR VOICES.
4. ALL WITCHES: Seek to know no more.
5. MACBETH: I
will be satisfied. Deny me this, and an eternal
curse fall on you! Let me know!
6.
SOUND: INTENSE BUBBLING-SLOWS-STOPS. THUNDER.
7. MACBETH: Why sinks that cauldron? And what noise is this?
8. FIRST WITCH: Show!
9. SECOND WITCH: Show!
10. THIRD WITCH: Show!
11. SOUND: THUNDER.
12. MUSIC: WEIRD MUSIC (BED)--FADES.
13. MUSIC: [B-3] HERALD HORNS (BRIDGE)--DUCK.
14. NARRATOR: Thus, the stage was set for...
(A pink hi-lighter line would be drawn vertically from just before cue #3 to just below cue #12.
Cue #13 would only be hi-lighted green since the cue doesn't play under any other cues. Note that I also included the machine track ID [A-2, B-3] when that music cue is on one or another machine. This simplifies the engineer's job a good deal.)
Rehearsals
The engineer should be familiar with the music and script before the cast and SFX crew begin the cue rehearsals. I suggest you read along with the script and practice triggering the music cues. Then do a second run-through adding any reverb or filter effects. It's important that you know your script and story. You'll be busy enough adjusting mic volumes when the regular rehearsal and production starts. At some recording sessions, I've had one person watch the mixer and the other read the script and trigger the cues. It depends on how many engineers you can get/pay.
Engineering radio drama is not difficult if you know your script cold. Don't make life tough for yourself by trying to wing it.
On-Air Style Live production Vs. Post-Production Assemblage:
This article has covered how to engineer a radio drama produced in the "golden-age" style, where all dialogue, music and sound effects are created in real time. However, much of it applies to the recording of the elements of drama that can later be manipulated in what is called "post-production."
I choose to produce audio dramas in the old fashioned "On-air" live style. If you have sufficient prep time and a large enough cast and crew, you can produce your show quickly, cheaply, and with a very realistic feel. However, to minimize errors, this method requires a bit of organization on the producer's part and enough rehearsal for both cast and crew. It also relies on the music being able to properly fill the times required by the script. I compose my own music for my productions in such a way that it will run just the right length for the performance.
Much more common is the style of production where the dialogue is recorded separately and then the music and sound effects are added in post-production. This method allows more editorial control, but can take longer since everything must be assembled and layered together--usually through a computerized multi-track recorder (For PC's: Cakewalk, Cubase, Vegas Pro, the free program called Audacity (https://www.audacityteam.org/) etc. For Mac's: Pro Tools, Digital Performer, the free Audacity-for-Mac, etc.)
A drawback with the post-production method is that the actors are performing in a vacuum--they can't hear the music or sound effects that will accompany them and this may result in a less expressive performance. Also extensive cutting and pasting of dialogue lines can ruin the actors' timing. Lastly, the amount of work required to assemble a show bit by bit can stretch out greatly, making for a tedious and expensive job.
A lot of people favor the intensive post-production method, but I prefer to record my shows live into a multi-track tape machine (a Tascam DA-88 or Edirol R-9 2-track recorder) and then dump that into a computerized audio editing program (Cakewalk Sonar. I then edit the separate tracks (music, SFX, dialogue) by replacing bad lines with re-takes, adding in extra sound effects and doing digital pasting of music cues (replacing the analog playbacks that were used when recording the whole show live). I've found that this hybrid method gives me a "live" feel while allowing for enough editorial control. With it, I am able to produce a high quality program in a very short time.
For some smaller productions, I record in my home studio directly to my computer's hard disk (using Cakewalk's "Sonar" software package). I then layer the music and sound effects tracks, assembling the program, scene by scene. This can be time-consuming, but is sometimes necessary when I have a very low budget for cast and crew.